Getting video projects approved can be a pain—especially when the process of gathering feedback is unnecessarily long or disorganized.
To optimize the video production process, it’s important that reviewers give feedback that’s direct. Annotations—comments and reactions from your peers or colleagues—are a quick and simple way to gather suggestions for how a video can be improved.
In this guide, we’re going to explore how to annotate video content so that getting a project across the line is made simpler for everyone. But first, let’s explain exactly what we mean when we talk about annotating videos.
Jump to section
- What are annotations in a video?
- How to annotate videos
- Tips for optimizing your video annotation workflow
What are annotations in a video project?
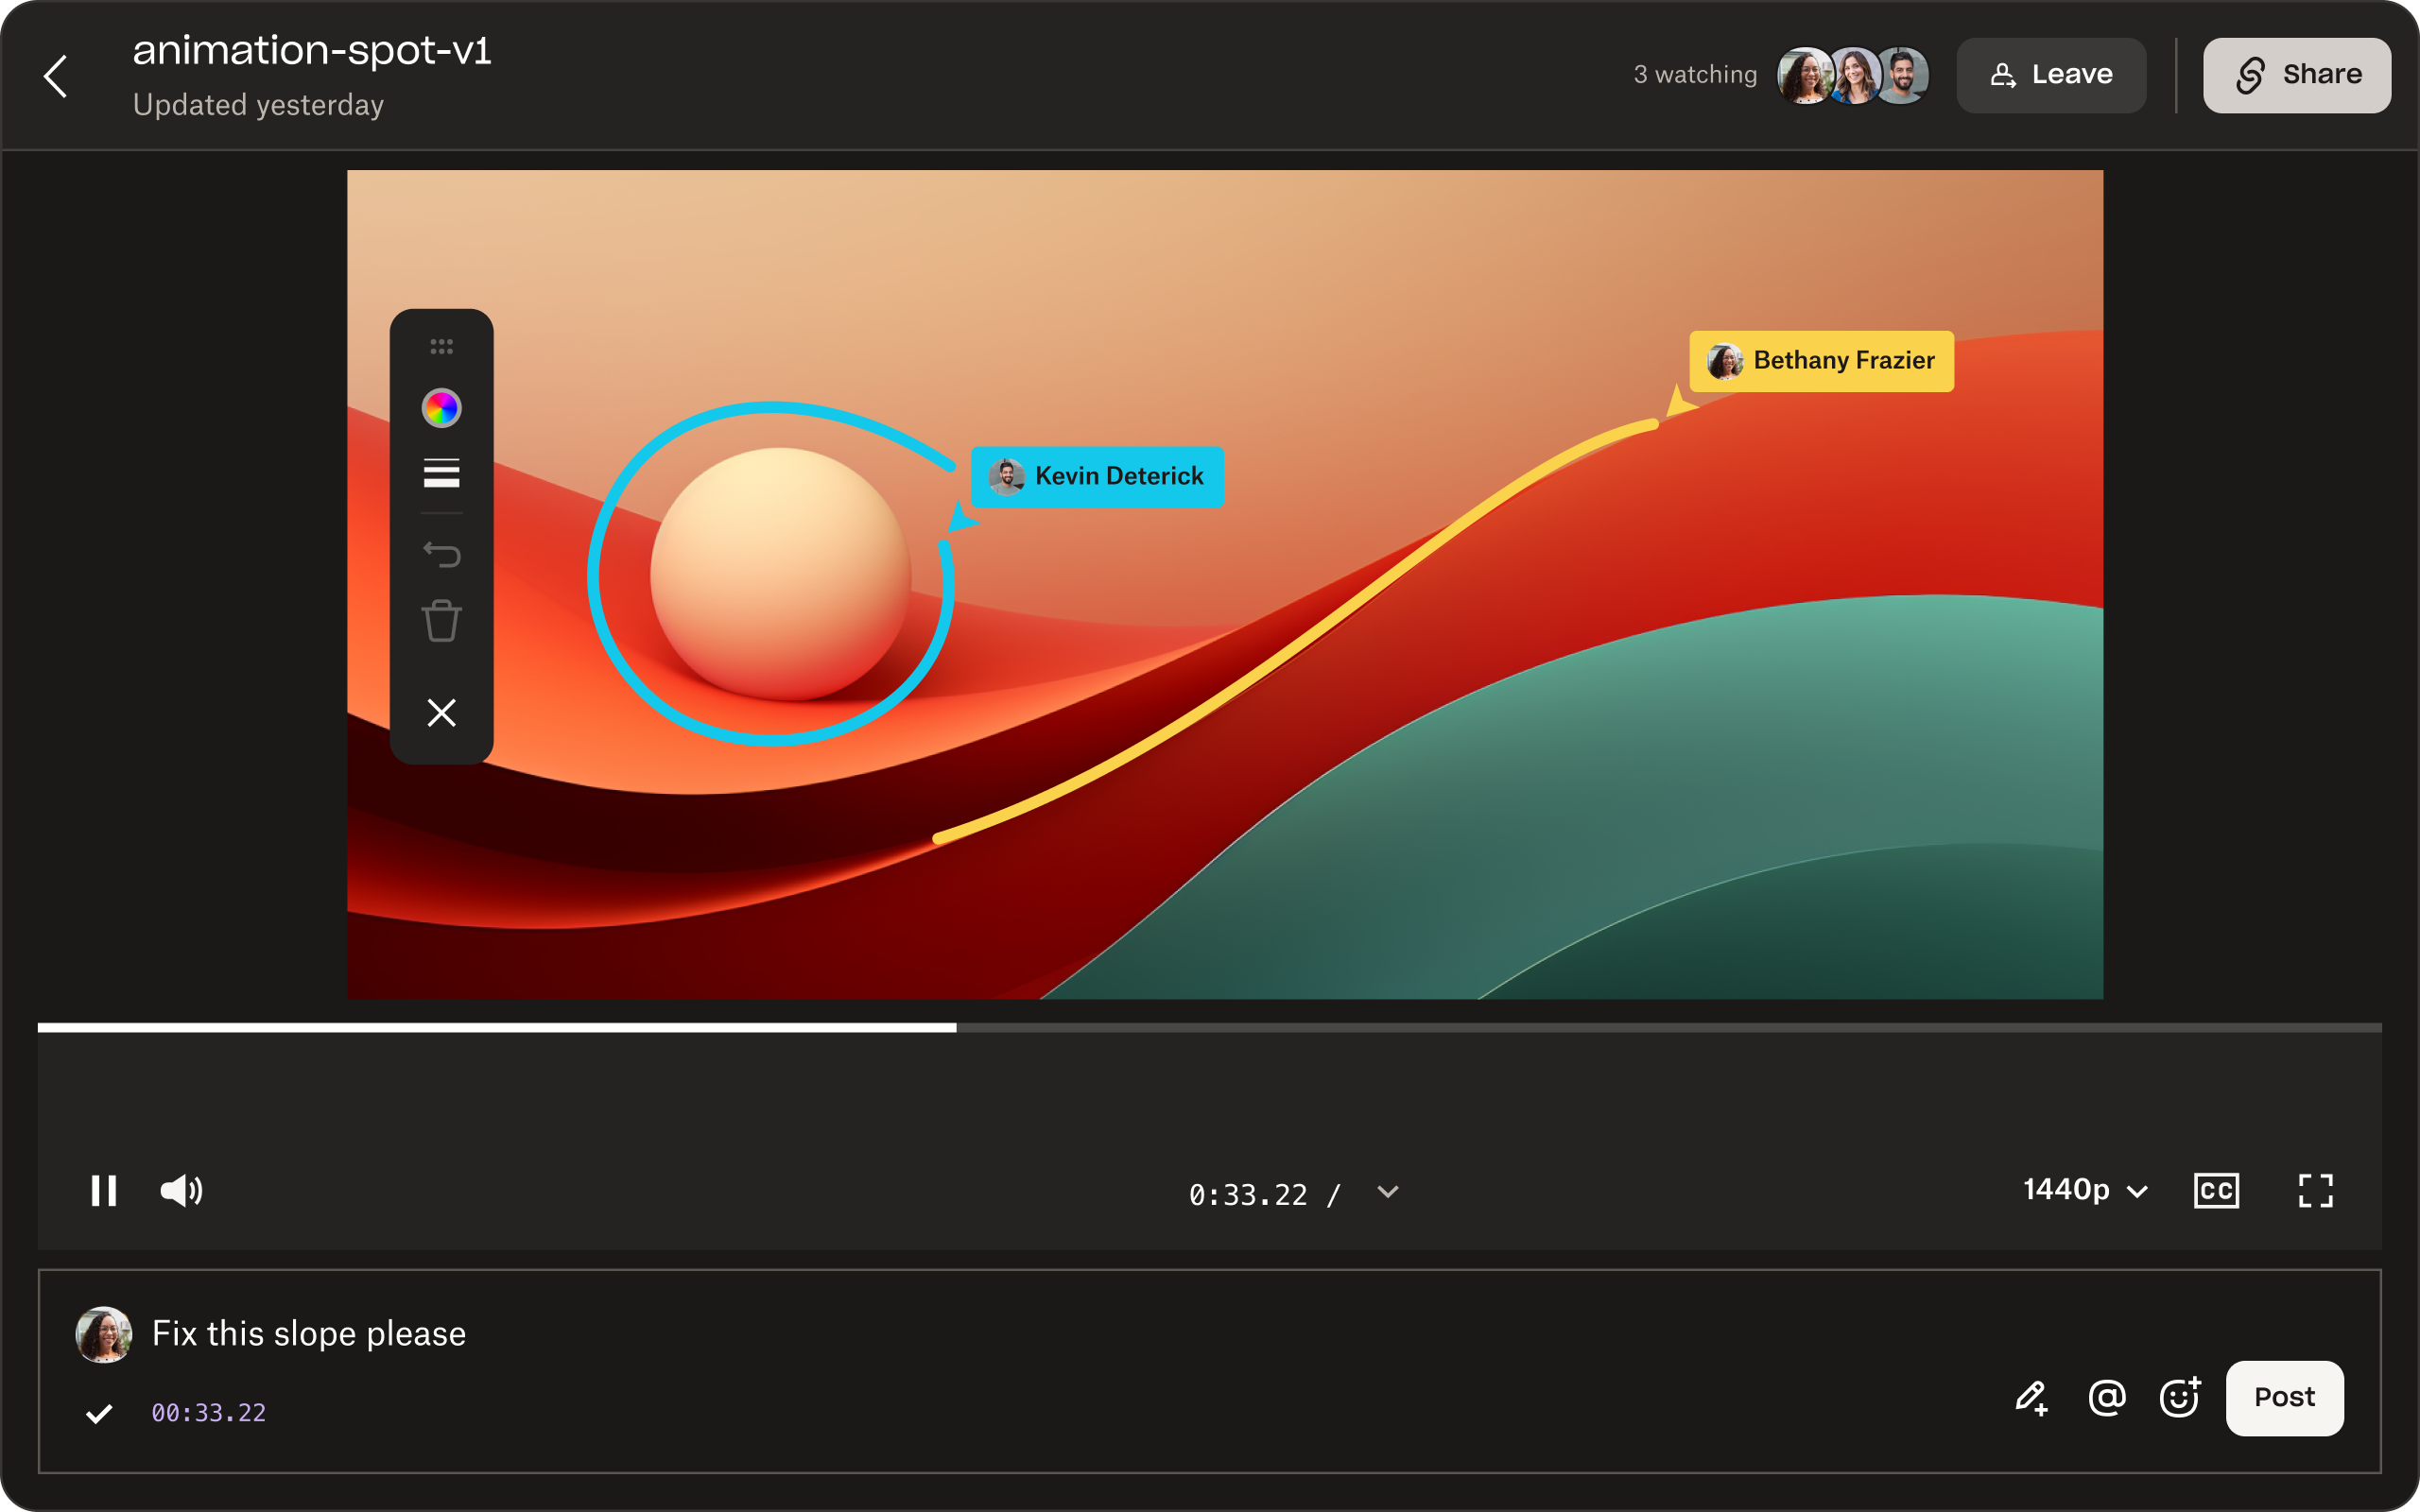
In a video project, annotations are part of the review and approval process. Those providing feedback on your projects can use a video review tool like Dropbox Replay to add comments with revision requests (or praise!) to specific frames.
But why bother using an annotation platform to provide feedback? Here’s what one Dropbox Replay user has to say:
“Before we used Replay, we had the dreaded black hole of sending emails out, attaching a video file, and then having collaborators face issues downloading or playing the file. And we’d get feedback about ‘that part where the guy in the blue kicks the ball’, which was hard to pinpoint. With Replay, they can immediately play the video and make time-stamped comments and annotations, even without any specialized software.”
- Rachel Jedwood, Production Officer, National Rugby League

How to annotate videos
Annotating videos can help you streamline the review process and get projects over the line quicker. With a simple process like the one below, your video annotation workflow can be hassle-free and effective.
Step 1: Choose software that’s accessible and easy to use
There are various tools available to help you annotate videos—but not all of them will be suitable to achieve the project goals or beneficial to you as the reviewer.
Some things to consider when choosing your annotation software include:
- Collaboration and shareability—will the tool be easy for the video editor (and other reviewers) to access and use? Will they need to download and install extra software to be able to collaborate on the video?
- Reviewer hardware—what type of device(s) will you and other reviewers be using when providing your annotations?
- Technical—will the tool support the file format/size of the video you need to review?
- Accuracy—can you provide annotations on particular frames or elements, or just general comments after the video has played?
With Dropbox Replay, you can send a video out for review with just a link. Browser-based reviews mean anyone can provide frame-specific feedback—no special software or Dropbox account necessary.

Step 2: Give your feedback
With the link to the video, you can review the content on your own time, or the video owner can set up a live review session, so you and any other reviewers can watch the video at the same time.
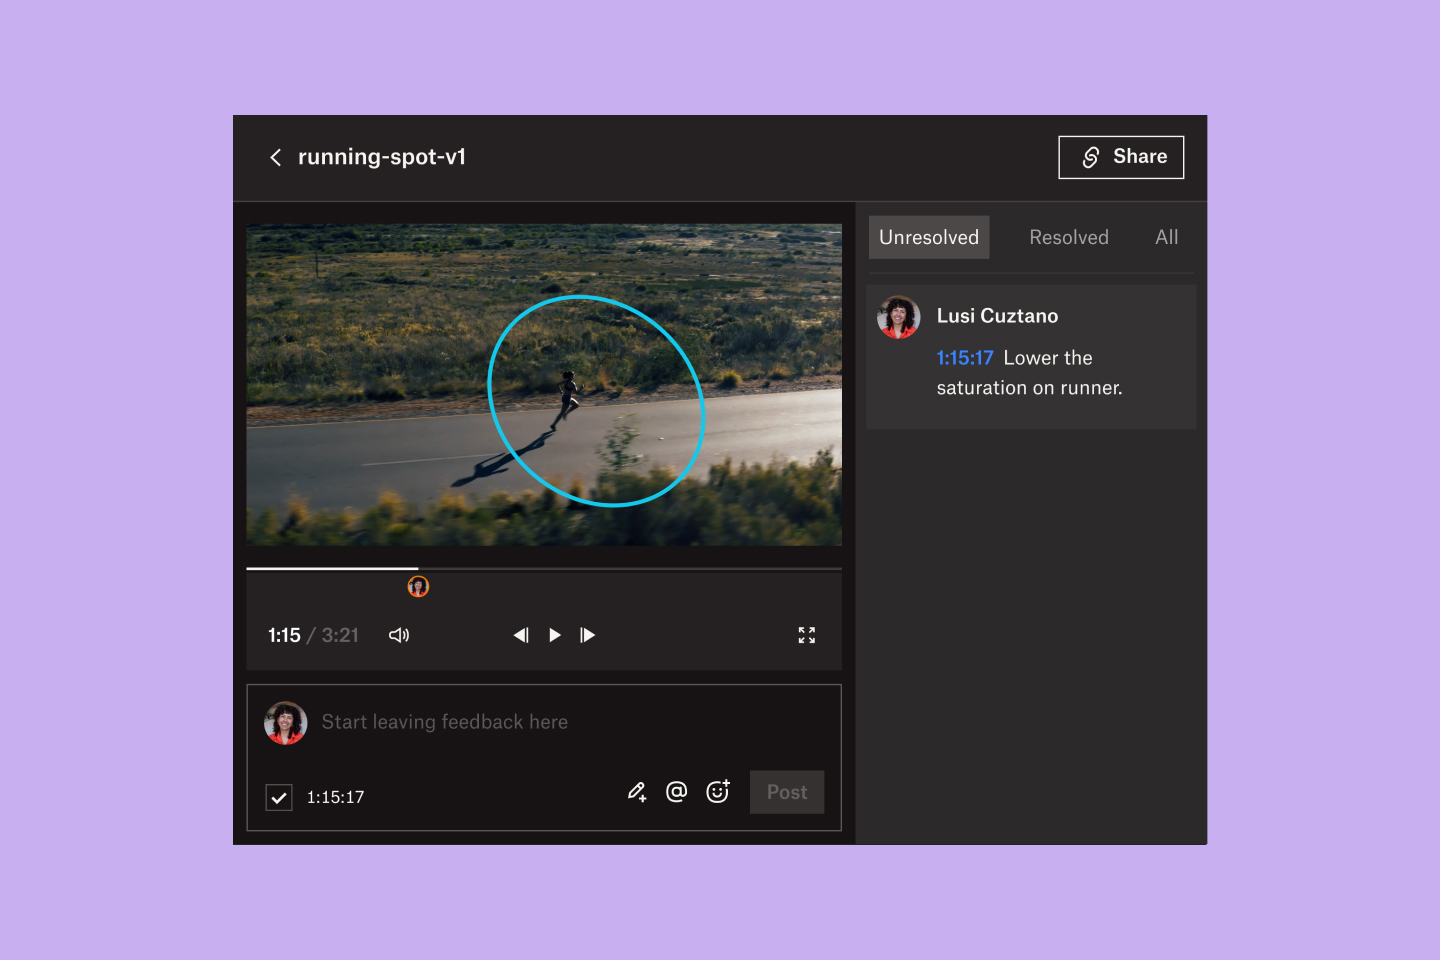
If you’re ready to give feedback on a video, you can provide annotations in just a few simple steps:
- Drag and drop the playhead or click on the timeline to select the frame you’d like to comment on.
- Type your comment in the text field.
- Click the Post button.
- See the comments you and your fellow reviewers have posted in the panel on the right of your screen.
Your annotation will also appear at the timeframe you selected in the timeline. You can edit your comments by clicking the "⁝" (vertical ellipsis) then Edit.
Step 3: Collaborate with others to perfect the video
If another reviewer or the video editor needs clarification on one of your comments, you can reply to and tag one another in the comments. Just click Reply and post your response.
Once the video owner or editor has actioned your feedback, they can resolve comments via the circle icon next to a comment. Resolved comments will then appear in the “Resolved” tab.
Tips for annotating video projects
An easy-to-use video annotation tool makes your approval process much simpler. But there are a few things you can do to ensure all of your annotations are effective.
Understand the project goals
Reviewers need to know the objectives, intended use, and target audience of the video when providing their annotations—otherwise, they won’t have the context needed to offer relevant and actionable recommendations.
Project goals will be based on a range of important factors, including:
- Brand image and values—how does this video represent the brand?
- Message and intention—who is this video attempting to serve, and what is it trying to say?
- Distribution—how is this video going to be shared with its intended audience? Publicly through social media, or privately with limited access?
- Longevity—will the video be “evergreen” content that stays fresh for a long time, or is the subject matter time-sensitive?
As the person providing the annotations, you should familiarize yourself with the project goals of the video before making your comments.

Be constructive with your comments
It’s worth the reminder: what you say in your annotations should actively help the video become sharper and more suitable for the intended audience. Whether you’re commenting on the pacing, framing, lighting, or product visuals, your comments need to be focused and clear.
Providing constructive criticism means understanding the project goals and putting aside your personal preferences. If you don’t think something is quite working, your annotations should explain why this is the case and offer potential solutions or workarounds.
Give references and examples where possible—this gives the video editor a clearer sense of direction when it comes to actioning the feedback provided in your annotations.
Be consistent
There’s nothing more frustrating for video editors than when their reviewers give conflicting feedback.
A tool like Dropbox Replay that allows you to attach annotations to specific timeframes can help you avoid this. You can pinpoint exactly where you think something should be changed, rather than burying your comments within a long message or email.
Consistency in your feedback also means keeping your annotations in one place—not spread out over different platforms and tools. Video editors and reviewers alike can start and end video projects in Dropbox, so you don’t need to waste time downloading and re-uploading your files to different places or hopping from app to app.
Dropbox makes it easy to upload, edit, and share videos for feedback, consolidate comments, and finalize video projects in one place. Upload videos and access feedback directly from Adobe Premiere Pro, Blackmagic Design DaVinci Resolve, and other editors—no more hopping from app to app.

Give clear, helpful annotations on video projects
Dropbox brings everything you need to elevate your video collaboration process, without sacrificing your favorite tools and editing apps.
Give and receive precise feedback, keep versions under control, and get projects across the finish line in a more streamlined and efficient way.
